Spring is the season of renewal and in many parts of the country a time to renew your golf car for the upcoming season of golf or just driving around town. Jack Triolo of Mountaintop Golf Cars in Banner Elk, NC and www.golfcarcatalog.com, a parts supplier, has been generous enough to pass on some tips and maintenance checks to ready your vehicle for driving. If you are a do-it-yourselfer some maintenance procedures and remedies for some of the problems you may discover are provided as well. However, if you are not the “hands-on” type, we suggest you have your local dealer perform the fixes or more involved maintenance checks.
There are two fundamentally different kinds of gas engines that have been used in gas golf cars over the years: A 2-cycle (also called a 2-stroke, which requires a certain amount of special 2-cycle oil to be mixed with the gas) and a 4-cycle engine (sometimes referred to as a 4-stroke and it requires oil in the engine crankcase, just like the oil in your automobile). This article will focus maintenance for a golf car with a 4-cycle engine with a carburetor that are now the predominant type powering golf cars, although electronic fuel injected engines are becoming more prevalent.
Besides the engine, the steering, the front & rear suspensions, the brake systems, the centrifugal clutches, belts & drive trains and the battery, starting & charging systems all need the same preventive care. After many years of experience this is the method of checking over gas golf cars I suggest. The general outline below is fairly straightforward. More advanced troubleshooting and repair procedures may require a Service Manual for the particular car you have.
STEP 1- Engine Inspection, Cleaning , & Checking Filters and Sparkplugs
Engine Introduction
A 4-cycle engine can run in one direction only and it needs two complete crankshaft revolutions to do the same thing a 2-cycle does in one…create power. Connected to the crank is a camshaft that opens & closes the intake & exhaust valves at very precise moments. The oil resides in the bottom of the engine case just like your automobile, not in the gas. The oil lubricates the internal moving parts by means of an oil pump or by mechanically splashing the oil and this oil must be changed from time to time. If water gets in the fuel it runs through the carburetor & cylinder but it won't ruin the entire engine. If you let the oil get too low, that WILL ruin the engine.
These 4-cycle engines create their own very fast alternating vacuum & pressure environment inside the engine by the action of the piston & rings going up and down in the cylinder so fast. The engine oil is what protects all these fast moving parts and that is why the oil is so important. When the cylinder, piston & rings, bearings, crank seals & gaskets begin to wear they lose the ability to contain the tremendous forces needed to maintain the proper internal engine environment. This means the engine begins to lose power. The fuel pump is one of the first things to be affected because it operates off the vacuum & pressure created in the bottom end of the engine. The transfer of fuel from the tank, through the carburetor, then into & out of the cylinder (combustion chamber, as it is called) is greatly affected by worn or bad parts. That is why it is so hard to answer, "Why doesn't my gas golf car run well?" Sometimes just one part goes bad and fixing that part solves the problem. Other times the entire engine has worn to the point where patchwork will not be satisfactory. Let's start right now at getting some SPRING into that engine and gas golf car.
A. Check For Leaks - Before any cleaning or service begins on a gas engine, take a very close look at the engine, engine components and engine compartment. Look for wet spots that indicate an oil or gas leak from the engine, the gas tank, fuel pump & fuel lines, and also around the differential input shaft. If you can see an oily buildup of dirt or wet oil, try to find out where it came from. You certainly want to keep an eye on it. Engine oil leaks are the toughest to pinpoint because they can come from many different places.
Where the actual oil leak comes from can tell a lot about what trouble might be lurking in the engine. A leak at the crankshaft between the drive clutch and the engine case, or at the bottom of the fan blower housing (opposite the drive clutch) may indicate a crankshaft seal leak. Gas golf car engines have a two-piece crankcase that sometimes will spring a leak along the seam that joins the case halves. Look for a very clean spot on the crankcase where any dirt has been cleaned away by leaking fuel. 4-cycle engines can also develop oil leaks at the oil drain plug, the oil filter, the valve cover gasket, the oil fill tube and probably a few other places I can't think of right now.
Look around the gas tank, fuel filter & supply hoses, fuel pump & carburetor for possible gas leaks (NO SMOKING, PLEASE!). Rub your fingers under the carburetor float bowl to be sure the bowl gasket is sealing properly. On 4-cycle engines check to be sure the oil dipstick is in place, the oil fill cap in place and that the valve cover gasket is not leaking. Before washing the engine and frame you might even check the around the differential (rear end) axle tubes and at the backs of the rear wheels where the brake cables attach. Wheel seal leaks permit oil from the rear end to leak into the brake drums where it will contaminate the brake shoes and this greatly reduces braking efficiency. Oil leaking from the differential behind the driven clutch (large round pulley that the wide drive belt wraps around) can cause oil to get on the drive belt and compromise pulling power.
Slight amounts of oil and dirt on & around the engine are not cause for great concern. If there is a wet looking spot and everything else around the spot is dry, you may have reason for worry. If an area on the engine has a lot of oil around it and others areas do not, make a mental note and continue to watch that area in the future after the engine has dried off. If fresh oil or wetness persists then an oil or gas leak may be indicated. We offer all the necessary parts to repair these problems, and the parts for the tune up procedures that follow. Notice below that the rear portion of the engine is dry and clean, while the forward portion shows signs of oil and dirt sticking to that oil.
B. Clean The Engine - Ok, we have looked over the engine and made mental notes of any problem spots. The best place to start the engine check over and tune up is to thoroughly clean the entire engine compartment. Start by applying an acid neutralizing/cleaning agent to the battery top, sides, hold down brackets and rack. Let it sit and work for a few moments while you spray a can of 'Gunk' brand engine degreaser, purchased beforehand at your local auto parts store on & around the engine. Follow the directions on the can. Generally, you spray it on the engine components & frame, let it sit a few minutes and then spray it off using a high pressure nozzle on a garden hose, preferably with warm or hot water, and then let it drip dry. Pay particular attention to the battery terminals and rack. Direct the spray around the four sides of the battery and don't forget the interior body panels. Fairway grass and dirt picked up on the golf course is very corrosive. A high-pressure washer will also work but be sure not to introduce water into the engine.
NOTE: If the engine is relatively clean and just a light coating of dust and dirt is the main culprit, then just neutralizing any battery acid present and a thorough wash down with the hose may be all that is required. You are not trying to conquer every spot, just keep the compartment relatively clean to make servicing the engine easier.
CAUTION: DO NOT perform this job 15 minutes before tee time or taking a drive. Sometimes getting water on the starter and drive belts will cause them to slip. Allow at least one hour or more for the car to sit and dry.
C. Check Filters
Air Filter - Now is a good time to check the air filter, the fuel filter and the oil filter. The purpose of an air filter is to stop airborne dust and grit from entering the engine and contaminating the cylinder walls, piston rings and engine oil. I have seen air filters that will support a potato crop. Not good! A dirty air filter can reduce engine efficiency by as much as 10% and lead to premature engine failure. Be sure the air filter housing is firmly attached and that the lid fits tightly to completely seal against dirty air bypassing the filter. Also check any air supply hoses that lead from the filter to the carburetor. These air intake hoses can deteriorate and allow unfiltered air into the engine.
Fuel Filter - Fuel filters perform the same function except they filter the gasoline. Dirty fuel will carry chunks of debris that can clog the very small passages in the carburetor and cause the car to run poorly, if at all. I have seen dirty fuel filters actually prevent a car from running because they are so clogged. Always buy your fuel from a high volume gas station and don't go on the days they fill the tanks. Bad gas (especially if it contains water) runs through the entire engine, top end and bottom end, and can permanently damage it or cause various parts to seize. Does this sound expensive? These filters are inexpensive items that make a big difference to engine life. They will not prevent water-contaminated fuel from entering the engine but they still go a long way in protecting your investment. Replace them regularly.
Oil Filter - I can't say enough about engine oil. Keep it clean and especially keep it topped up. Any brand name regular 30 weight motor oil (or 10W30 in colder climes) is fine in a golf car 4-cycle engine. The same oil you use in the auto. If you personally change the oil please recycle it. Local auto repair garages or your municipality will guide you to the proper disposal facility. Remember that the oil filter is considered toxic waste too and should be disposed of in a similar manner.
Be careful not to overfill the oil in a 4-cycle engine gas golf car. Excess oil will find its way into the air filter housing, soaking the filter and, eventually, getting into the combustion chamber causing smoky and uneven running of the engine, even fouling out spark plugs. Oil is the absolute lifeblood of any gasoline engine. If it is low or dirty or too old (thick & black when you look at it on the dipstick) make arrangements to have it changed soon. I cannot stress this too much. Even if the damage is not severe enough to kill the engine, rest assured that no good comes from this condition. Change oil at least once a year, more often if you use the car a lot, especially in dusty areas. Check the oil level every time you put fresh gas in the tank. If you change the oil yourself plan on changing the spin-off oil filter too if your golf car has one. Check your service manual for the proper amount of oil to use.
D. Check The Sparkplugs - Now is also a great time to check the condition of your spark plugs. They can tell you a lot about the condition of the engine, the carburetion and the ignition system. Without an adequate spark to fire the compressed fuel in the combustion chamber, your car will have difficulty starting, running, and pulling. A new spark plug can make an unbelievable difference in how the engine performs. Remove the plug(s) for inspection. Clean the electrode and check the spark gap based on the manufacturer's recommendations (in most cases it is .028?). There should be no significant buildup deposited on the electrode end. The ceramic insulator in the center should have a light brown or coffee color. A black sooty appearance indicates too much fuel and not enough air. White indicates a lean condition (too much air, not enough fuel). Fouled spark plugs are often indicated by a wet, black appearance (see below). This could be caused by a dirty air filter element or other restrictions in the air intake system. Incorrectly adjusted valves, spark plug wires that are in poor condition or poor quality fuel could also contribute to the problem. Replace fouled plugs. Be sure to tighten new plugs to 18 ft/lbs. (24Nm) torque.

STEP 2 - Maintaining & Servicing the Battery, Starter Generator & Ignition System:
WARNING 1: For your personal safety always remove all metal rings from fingers, watchbands or bracelets from wrists or any loose hanging necklaces. If the jewelry becomes a short circuit between a battery and ground, it will ruin your day…not to mention the cherished jewel!
WARNING 2: Eye safety is a vital concern as well. Wear adequate eye protection! Splashing fuel and battery acid will burn if it gets in or onto tender body parts. Also be sure to tie back long hair as it can get caught in the spinning components of the engine. DO NOT SMOKE! A spark from a cigarette or an inadvertent battery short, such as a dropped tool (or ring), can cause even a 12-volt battery to explode, spew battery acid and possibly catch fire (I know this from 'lucky' personal experience, thank you). Extreme caution is indicated. At best an exploding battery will put the hurt to your ears and a twitter to your heart for a few minutes.
Introduction: The battery, starter/generator (st/gen) and ignition system make up the electrical system for the gas golf car. They are all interrelated and are almost as important as the engine to reach expected performance. I will make a few introductory comments here and then get down to the basics. First of all, gas golf cars will not run without a good battery…you cannot 'jump' the battery from another golf car as you can in an automobile. The system needs a constant 12-volt current to operate. The battery must be connected with the positive (+) post to the solenoid and the negative (–) post to ground (frame) and to the engine case proper. The ignition system will not produce a spark if the battery polarity is backwards. I have grouped all these components into one section because they are so interconnected.
A. Check The Battery Water Level - First, be sure the cell caps are snuggly in place. Most modern 12-volt batteries are 'Maintenance Free'. Ha! If your charging system is overcharging the battery, it will boil out the electrolyte just like the old batteries would. Usually the cell covers can be removed and the water checked (you will need a flat screwdriver to pry off the caps). Be careful if you remove the caps not to introduce dirt and other contaminants into the cells. If water is needed, use distilled water if possible. A Battery Filler Bottle will help you get just the right amount of water in each cell and you can use this durable, inexpensive, filler bottle for your golf car, boat, auto and truck batteries too! Local tap water may or may not be suitable to use. It depends on the quality and trace minerals present in the water. It is always best to use distilled water, which you can find at any drug or grocery store.
Generator Voltage: If you do find the electrolyte level of the battery to be low it could be due to the starter/generator overcharging the battery. This significantly shortens the life of any lead acid battery and boils the battery dry–not good! Your local dealer can check the voltage output or you can do it yourself if you have a multi-tester or 'VOM'. The positive (red) probe goes on the positive battery post (+) and the negative (black) probe goes on the negative battery post (–). With the gas golf car engine running the meter should read 14 to 14.5 volts DC. Anything below 14 volts is marginal and may not keep the battery charged up. Anything above 14.5 volts is too much and may boil the battery dry.
B. Check Battery Cables - Carefully wriggle the positive and negative battery cable ends side-to-side and gently up & down. There should be no looseness or movement. If there is then the cable end needs to be tightened some more. The up & down motion should not cause the cable terminal end, which is secured to the battery post, to flex…it should be rigid to the post. The cable itself will flex but the metal terminal end should not. If it does easily flex, or worse, it's downright floppy, you may have a battery cable end about to fail. Fix it before it fixes you, where you least expect it! Also carefully inspect the ground cable that connects the battery negative to the frame of the car. DO NOT overlook the battery ground of a gas golf car. A bad or faulty ground will drive you nuts! It will cause one to look everywhere, except at the ground, for an electrical problem because it seems as though the problem HAS to be elsewhere else. DO THE SIMPLE STUFF FIRST!!! Start with the basics and then move to the more complex. If the ground cable at the frame looks rusty or corroded; REMOVE IT & CLEAN IT.
C. Check for Terminal Oxidation and Corrosion - The type of terminal oxidation mentioned above looks fundamentally different from battery rack corrosion. The positive terminals generally take the brunt of the corrosion but the negative posts will corrode too. If they are badly corroded, you should have them cleaned by your local dealer or do it yourself.
Corrosion can appear as thick yellow goop (sometimes gooey, sometimes hard), white powdery fluff or as bluish goo. Sometimes these different kinds are on the same terminal or post or battery rack. This is never a good thing, as corrosion seems to beget more corrosion. Real trouble comes when it starts to get on the frame of the car. You can wave goodbye to the battery racks and car frame in severe cases. And it is so easy to prevent! Just hose off those batteries and racks several times a year. No big deal! If the battery rack corrosion is bad enough, you will need to remove the battery and clean the rack and battery hold down bracket. After a thorough cleaning, allow it dry and treat the metal rack with a protectant. This will give you a head start on preventing future corrosion. Bare metal will rust and corrode much faster than properly treated metal. A paint-based treatment is not recommended because when the paint dries the acid atmosphere will cause it to flake away, soon exposing the metal rack to new corrosion.
Battery Bracket Note: Don't overlook the importance of the brackets that hold the battery firmly in place. The manufacturer would not include these items if they were not needed. They prevent the battery from rattling around or tipping over while the car moves over rough terrain. They help protect the fragile lead plates that allow the liquid electrolyte to freely course through the sponge-like pores that allows the battery to convert chemicals into electricity.
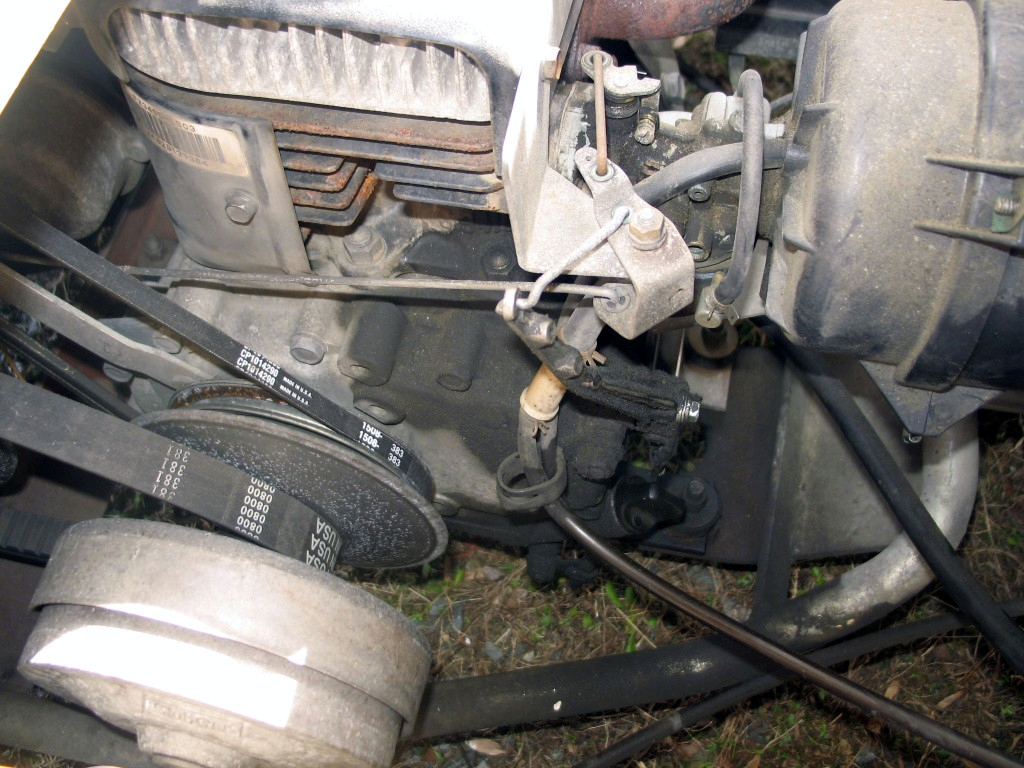
D. Check Starter/Generator Connections - The starter/generator must be firmly attached to the engine frame. It should not move, rattle or be in anyway loose. The cables & terminal studs & frame insulators should all be clean & tight with no signs of melting, heat buildup, rust or discoloration. Wriggle the cable ends to be sure they are tight. The starter/generator belt wraps around the small pulley on the st/gen and around the large pulley, called the drive clutch, on the engine. The st/gen belt should be clean (no oil on it) tight and no fraying or cracks evident. If this belt gets loose it will cause starting, and sometimes charging, problems, especially when wet.
The st/gen is probably the most reliable part on the car but if the internal brushes get too short it will not charge or start the car. The brushes are located directly under the black rectangular rubber covers on the st/gen (early st/gens have a metal band secured by a screw). Use a light to inspect them. If the top of the brush is level with or recessed down into the guide that keeps them in place, then the brushes are too short and must be replaced…pronto! The brushes usually wear away at different rates, so the one you are inspecting might be the shortest of the four in the st/gen. It only takes one to stop it from working properly. If the brush sticks up out of the guide 1/8? or so, they are most likely OK.
In addition to starting the car, the st/gen also recharges the battery. All of the charging current comes out of the small, 'DF' (8mm or 5/16? wrench) terminal on the st/gen, then runs along a thin, usually green, wire to the voltage regulator. The regulator takes this current and turns it in to something the battery can accept, namely 14.5 volts. Both the starting & charging current run through the solenoid so it too must be good working order.
E. Check Shifter Cables - 4-cycle engines can operate in one direction only so they must be coupled to a transmission. A mechanical hand-operated shifter with a cable(s) is employed to actually shift the transmission from forward to reverse. Much older golf cars may have two shifter cables, one for forward & one for reverse but newer golf cars have a single shifter cable more like a motor boat steering cable. These cables can freeze in very cold weather or bind due to rust or the cable housing getting caught on a stump or rock. Or a cable can just plain break. Any of these conditions will cause difficult, if not impossible shifting. Inspect the cables carefully to be sure the cable is not fraying at the Forward/Reverse (F&R) switch or back at the transmission. Check under the golf car for a drooping cable or signs of kinking.
F. Check The Carburetor Cables - Most golf car carburetors use some type of cable arrangement to operate the choke, the throttle and the governor. These cables must be in good working order. No frayed strands, no kinks and they must slide freely through their respective cable housings without binding. The cables must be adjusted correctly too. If the throttle cable does not close the carb completely, and, at the proper moment also cut off the accelerator switch, backfiring will result. If the choke cable is a little too tight, or binds, then the engine runs with too much gas. This is called a 'rich' mixture and it is not good.

G. Check The Clutch System - The drive clutch, the driven clutch and the drive belt are the last items on the car that are specific to gas golf cars. The drive clutch attaches to the crankshaft on the engine. The driven clutch attaches to the transmission. The wide drive belt connects the two clutches.
At rest, the belt rides down in the center of the drive unit and out at the perimeter edge of the driven clutch. As the engine spins flyweights in the drive clutch force the pulley halves together causing the wide drive belt to ride up higher on the clutch faces. This action makes the driven unit separate as the belt forces its way down the driven clutch faces. All of this works as an automatic transmission of sorts. If both clutches & belt are in good condition they smoothly slide in & out in reaction to the speed of the engine.

If either clutch face or the belt (or all three) is worn or the flyweights are broken or the plastic ramp buttons in the driven unit are worn or broken, all kinds of power loss can occur. A perfectly fine engine will not transfer power to the rear wheels if the clutching system is bad. The efficiency of the clutches also can be compromised by bad motor mounts or, in Yamaha gas cars, by a broken engine tensioner cable located at the front driver side corner of the engine frame. This is the dynamic: The engine frame is mounted to the car chassis by means of several rubber motor mounts. When the clutches are engaged the engine & engine frame are pulled toward the differential. The rubber motor mounts, and the Yamaha engine tensioner, prevent this action from being too severe. If the engine & frame move too much, some of the 'gear ratio' effect of the clutches is lost resulting in reduced start-up & pulling power.
STEP 3: Finalizing the Spring Prep
A. Check Tires - Low tire pressure makes the battery pack have to work a lot harder to power the car around especially in grass or loose dirt & gravel. Check the tire pressure and inflate to 20–25 psi. It is somewhat normal for a tire to lose 5 to 10 pounds of air pressure over a long storage. If you have had any problems with a slow leaking tire, don't waste your time with the foam 'fix-a-flat' stuff that comes in aerosol cans. Usually it does not work permanently and can damage aluminum wheels. I recommend taking the tire to a professional and having it plugged (it's only about $5) or, if the tread is still pretty good, have a tube installed.

While you are down there filling the tires, look at the tread and sidewalls. The tire tread wear should be even across the entire width of the tire. If the center of the tread is worn too much the tire may be over inflated. If the outer edges are worn away then a chronic air leak is indicated, maybe due to weather-cracked sidewalls or a pesky nail or golf tee. (Sidewall cracks are very common and the cracks may or may not be the cause of the air leak. Apply soapy water with a brush over the sides & tread of the tire and look for bubbles caused by escaping air.) If one front tire is worn a lot more than the other, or the tread has signs of feathering or scrubbing in one direction, then a front-end inspection & alignment may be needed.
B. Grease the Front End - In order to keep your steering system working smoothly and to prevent any metal-to-metal deterioration, it is recommended that your front end be greased at least once a year. For those that use the car year round or use the car above and beyond 'normal' usage', you may need to do this more often. You can have your local golf car dealer do this or do it yourself.
C. Check the Brakes - The beginning of the season is also a good time to be sure your brakes, brake cables and hill brake catch mechanism are all working. It doesn't do a lot of good to have a great running golf car that you can't stop and keep stopped. A hill brake lock mechanism that unexpectedly pops off is a mortal danger to anyone downhill from you.
Thoroughly inspect and test your brakes regularly. Begin (with the key off and on flat ground) by pressing the brake pedal. Feel to be sure the pedal doesn't feel mushy or weak. If the pedal tension does feel weak, you may have a frayed, kinked or broken brake cable, need to disassemble & clean the brake shoe adjuster mechanisms, or perform an adjustment to the turnbuckle or compensator spring assembly where the cables attach to the pedal underneath the floorboard. Carefully check the cables for battery corrosion, rust, kinks or signs of fraying or unraveling. If the pedal tension feels ok, but you still have to press extra hard on the pedal for adequate stopping, you may need to replace the shoes or inspect the brake drums. You can purchase new cables and brake shoes and install them yourself or have your local dealer do it. Any of these components or combinations thereof may need replacing or adjusting to achieve the proper brake feel.
With the vast array of shoes and cables out there, I have seen all kinds of jury-rigged combinations. The correct shoes, installed & adjusted the proper way, with the correct brake cables & drums helps insure proper braking and personal safety. The hill brake catch mechanism is hard to inspect on any car. There are two parts; the notch (usually found on the hill brake pedal) and the catch plate (usually attached to the frame of the car). Either or both can wear and unexpectedly pop off creating a dangerous rollaway situation. The best way to check this is to get down with a flashlight and carefully look at both components for wear. The other way is to lock the hill brake down as you normally would, then reach down with your hand and try to dislodge the catch mechanism by shaking & pulling at it. It should hold very firmly. If it seems to pop off too easily then there may be need of closer inspection. Consult your service manual for complete instructions or have your local dealer check it for you.
D. Check the Differential Gear Oil - This is often overlooked for years and lack of oil will cause the differential gears to start clashing, which leads to an audible gear whine noise as you accelerate, cruise or coast. All of the modern Dana brand differentials take regular 30 weight motor oil but other brands may take heavier 90 weight gear oil. It is always best to consult your service or owner's manual. If the oil is determined to be low; add to the bottom of the fill hole. Be sure you are adding oil to the actual fill hole and that you are not overfilling because this can lead to other problems such as blown wheel seals and oily brakes. I always look carefully for signs of oil leaks around the differential cover plate and at the end of the axle tubes where the wheels attach. If things look oily or caked with damp looking dirt chances are you have a leak somewhere.
E. Check the Reverse Buzzer! - OK, OK, everybody hates these loud obnoxious intrusions while concentrating on backing up. I find many cars that have a wire pulled or cut off. Others that just don't work. I also find cars accidently left in the reverse position, standing quietly, ominously, waiting to unexpectedly go into reverse when the gas pedal is pushed. Don't do this! That buzzer is for everyone's safety. With the modern 'regen' cars the buzzer functions as the 'roll away protection' warning signal as well. In today's market, where the majority of golf cars are used for personal transportation and where parking areas are crowded with other golf cars and people standing around, a disabled or broken reverse buzzer is inviting disaster. And perhaps a lawsuit! If the buzzer is too loud, locate where it is located on the car and partially cover the buzzer hole with a piece of duct tape. This will cut down on the high pitch while still making enough noise to warn the driver, and those standing around, that the car is in reverse. If you walk past an unattended car accidently left in reverse, do your neighbor a kind deed and shift it to Neutral. The legs you save may be your own!
F. Check Other Battery Cable Connections - The last thing to really take a close look at is how tight the battery cable connections are throughout the electric golf car. I mentioned loose battery cables at the battery posts proper but anywhere the heavy cables are attached–the motor, the F&R switch, the newer electronic speed controller terminals and especially on the solenoid (the most common failure)–must have a clean tight connection. Looseness=Heat. Heat=Failure…sooner or later. Again, if you can wriggle the cable end under the nut that secures it, it is loose! If the entire contact moves on the board to which it is attached, then the contact is loose on the board. If the cable end or the stud & nuts look oxidized, rusted or discolored compared to other nearby connections, it indicates a heat buildup and impending failure. Deal with these problems while you have the vehicle where it can be repaired. Otherwise you will be dragging that bad boy home.
If you need to order any parts or service manuals or need help with some of these issues contact Golfcarcatalog.com at 800-328-1953 or 828-963-6775 (fax: 828-963-8321).